Gcalo
New member
Lowering A 360 or 430
Before one drops the vehicle height one must know if the current height is a factory setting. This is done by measuring the length from the bottom of the spring resting washer (part into which the spring bottom sits) to the center of the lower shock bolt. The factory values are as follows:
Front Shocks
Yellow markings: 155.2 mm –156.2 mm
White Markings: 153.7 mm – 154.7 mm
Red Markings: 152.2 mm – 153.2 mm
Rear Shocks:
Yellow markings: 171.7 mm – 172.7 mm
White Markings: 170.6 mm – 171.6 mm
Red Markings: 169.5 mm – 170.5 mm
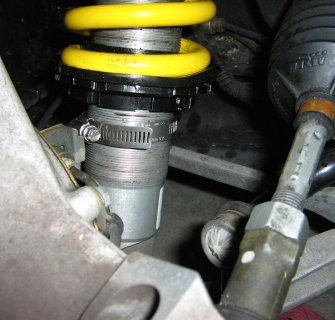
If the front spring is not removed from the car, you can still measure the above distances to verify if you are at original settings before you start the lowering process. You will need a thin metric ruler that starts at 0 mm at the very edge of the ruler, because you are going to measure from the top of the lower shock mounting bolt to the bottom of the upper spring support ring. Slide the ruler down along the shock body so that it slips between the shock’s lower mount and rests on the securing bolt.
The lower front shock bolt is 12 mm in diameter. So you will add to the measurement you make ½ of that or 6 mm for the total length, and compare that with the above.
Alternatively if measuring the shock is difficult the car’s height can be measured before lowering.
Find a suitable location to measure the before and after heights. Make sure the car is on level concrete so your measurements are accurate and then get under to measure the height!
It is also important to know both the OEM height measurements and the points from which the measurements should be taken.
OEM height measurements are: front at 125.2 mm (4.929”) and the rear is 146.8 mm (5.779”).
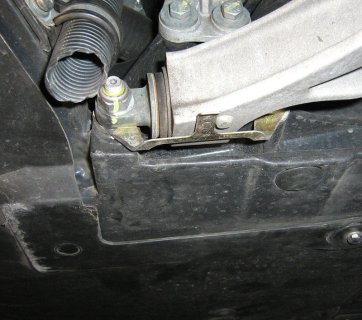
Front: ahead of the front wheel at the structural member body side of the wheel and just forward of the lower A frame securing bolt. There is a rubber drain tube there. Measurement is just behind that tube on the aluminum frame. See photo on right.
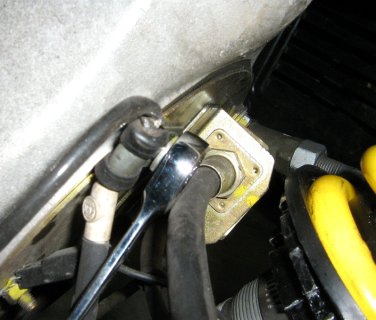
Rear: forward of the rear wheel at the structural member body side of the wheel which is right below the curve of the lower air scoop as seen from the external side of the vehicle.
Ferrari suggest that each seat should be weighted with about 150 lbs of ballast and about 50 lbs in the trunk for proper height measurements and for proper height alignment purposes. That might be a bit over the top, but one should bear in mind that when lowering the vehicle w/o such ballast weight that the car will sit a bit lower with driver and then again slightly lower with passenger.
Hill Engineering makes a wrench for the lower locking ring P/N: LNS-02. It is about $50.00. This tool works well if the shock rings are loosened when the spring is not on the vehicle. However, it is of little value if adjustments are made with the shock body on the vehicle. It is wide, flat, and will not fit w/in the wheel well. Not ideal for use when adjusting ride height with shocks mounted
McMasters-Carr offers a variety of spanner wrenches that are tremendous for adjusting coilovers. Go to: http://www.mcmaster.com/#spanner-and-drum-wrenches/=wj7ul
The main 360 shock spring collar has slots spaced at 90 mm’s in diameter. The McMaster’s spanner wrench P/N: 6975A22 will fit this. This is a fantastic wrench and makes adjusting both the spring securing ring and the locking an easier task. This is really the only one you’ll need. Buy it.
The lower adjustable locking nut has slots at 70 mm’s in diameter. Their P/N: 6975A21 wrench should work, and it is easier to use with the shock still on the vehicle. This is highly recommended.
Calculating vehicle drop is based upon the number of downward turns of the spring retaining ring. Total body drop is affected by the Motion Ratio which is the ratio of shock travel versus wheel travel. It is equal to the Shock Travel (in inches) per 1 inch of Wheel Travel. Motion Ratio is used to account for the different suspension geometries and the resultant mechanical leverage on the spring. In almost all cases, the Motion Ratio is less than 1.
One can generally calculate the Motion Ratio by simply dividing the shock travel by the wheel travel. Example if the shock travels 0.5 inches and the wheel travels 1 inches then the motion ratio would be 0.5/1 = 0.5.
It is believed that the Motion Ration of the 360/430 suspension is about 0.70. The value cannot be found in the Ferrari workshop manual for some reason, but it is believed to be accurate. Thus the formula below is based upon the 0.70 value for the Motion Ratio. M.R. 0.80 is shown for reference.
So lets say you want to achieve a 1" drop. Basing the calculations on the MR value as 0.70, 12 turns will drop your vehicle 1" (25.45 mm/cm/1.5mm = 16.97 turns X 0.70 = 11.88 turns/cm).
The threads on the Ferrari shock body are pitched at approximately 1.5 mm which means that every turn of the ring should equate to a drop of 1.5 mm.
This means that for every downward turn of the spring support nut with a motion ratio of 0.70, you would get about .084” of downward travel of the body. The specifics are for two M. R.’s are below:
See the attached table Motion Ratio below. This sytem does not properly pick up my column spacings.
Remember that these figures for the 0.70 Motion Ratio are based upon lowering the vehicle with the factory springs in place! M.R. 0.80 is shown for reference purposes only.
An important point is that there is a 10 mm bolt that holds a metal strap that supports the wiring for the brake pad sensor and for the ABS connection. It is advisable to remove that bolt and let the wires hang down out of the way before doing any shock height adjustments!
You will then need to loosen the lower locking ring first and then rotate the ring downward to the desired number of turns. You can use a 2 ¾” stainless steel hose clamp to hold the adjusting ring at the desired # of turns. It will hold it firmly in place.
Note that the rings have red/green marks on them. Use them for reference but also mark the two aluminum rings for additional reference in case the turning scratches off the paint marks.
WD40 has a new spray can that has a fixed tube that pops up to spray into tight spots. You will need to well lubricate the area above and below the spring retainer! There is considerable pressure against that ring from the spring so be prepared to use a good deal of muscle to start the ring turning. It gets easier as it is turned down, but it does initially take a good bit of energy.
When you get to the desired level lightly tighten the lower ring and then do all the others. When you have the desired drop, recheck all vehicle height measurements from underneath, and then securely tighten the locking ring.
Two important considerations about lowering with factory springs:
1) You are extending the motion of the factory spring and this can cause body roll. If you add a spring such as the AFCO, you are reducing the spring motion while increasing the spring pressure which is ideal.
2) Make sure to get the car properly aligned after changing the springs and/or lowering.