Club Scuderia
-
Please take a minute to read this thread about our recent server issues and forum platform Switch
You are using an out of date browser. It may not display this or other websites correctly.
You should upgrade or use an alternative browser.
You should upgrade or use an alternative browser.
Another 348 Rear End Resto!
- Thread starter Quigs
- Start date
J70
New member
Bah!
I study these restos , and you post up some photos, I think "Heh, thats cool, will add that to the list" and I go off and research, and prepare, and budget, and plot and plan - and then you chaps post up another series of pics taking it to another level - and I have to start again! :laugh:
Nice work Graham. I thought you were just going to swap the bumper? :laugh:
Pangea
Active member
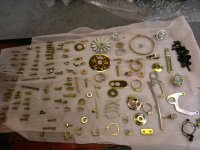
The plater will run everything through an acid bath to remove any pre existing plating, oil, dirt etc. but if the components are rusty they should be blasted first. Zinc plating will not take well to rust from what I've seen in the past. The blasting can give a rough surface which is not great for finish so polishing
any surface defects out after is a good idea. The plating will not cover up anything. What you see is what you get. Ive hand polished what I could before
the process. As shown below. Final results were great.

any surface defects out after is a good idea. The plating will not cover up anything. What you see is what you get. Ive hand polished what I could before
the process. As shown below. Final results were great.


The plater will run everything through an acid bath to remove any pre existing plating, oil, dirt etc. but if the components are rusty they should be blasted first. Zinc plating will not take well to rust from what I've seen in the past. The blasting can give a rough surface which is not great for finish so polishing
any surface defects out after is a good idea. The plating will not cover up anything. What you see is what you get. Ive hand polished what I could before
the process. As shown below. Final results were great.
View attachment 139057
Many thanks I feel some polishing coming on.
Regards
Simon


milkshaker0007
Active member
Where did you get your suspension bushes from graham???
Don't look like super performance parts or are they?
Let me know as will be doing mine soon on 328
Cheers
Where did you get your suspension bushes from graham???
Don't look like super performance parts or are they?
Let me know as will be doing mine soon on 328
Cheers
Hi Paul - All suspension parts and HE bearing from Superformance. Everything else from Maranello
milkshaker0007
Active member
Thanks for that
It was just that the anti roll bar bushing I got last week from super performance were more like a deep red colour and the holding brackets were out of stock so just tarted them back up.
Mind you when I took all the old bushings off they were in a very bad state, some just crumbled up.
Sweet now though, took it out today to collect turkey from the farm in Bridgnorth, even got to choose which one I wanted:grin::grin:
Merry christmas resents1:
It was just that the anti roll bar bushing I got last week from super performance were more like a deep red colour and the holding brackets were out of stock so just tarted them back up.
Mind you when I took all the old bushings off they were in a very bad state, some just crumbled up.
Sweet now though, took it out today to collect turkey from the farm in Bridgnorth, even got to choose which one I wanted:grin::grin:
Merry christmas
resents1:So back to spending time in the garage and just a quick query if anyone can help me.
As Im doing my cam seals, obviously the cams have to be taken out. Ive marked the cams, wheels, belts as much as I can but Im just wondering when I re-install, the cams will need to be turned individually to line up with the original marks. Now although they line up, could a fraction of a mm make a difference to the cam belt running over it, i.e. it could potentially be a little tight or loose as it runs over the two adjacent cam wheels...or am I worrying too much again?
You can see in the photos before I took my cams out the two cam marks didn't directly line up with the bearing marks...hence my query!
Things starting to come together now.
Had my local engineering shop do the cam seals for me to avoid me messing it up.

Also noticed someone had cut straight through the anti-roll bar bush housing to remove the previous one and filled it with gunk, so had them re-weld it

Had new threaded inserts installed in the cam covers as the originals all seemed a bit worn

Had my local engineering shop do the cam seals for me to avoid me messing it up.
Also noticed someone had cut straight through the anti-roll bar bush housing to remove the previous one and filled it with gunk, so had them re-weld it
Had new threaded inserts installed in the cam covers as the originals all seemed a bit worn
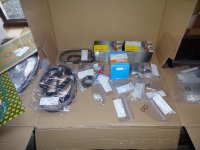
Another query for you all. I ordered the electrical cover Part No 107003 and you can see its much smaller than my original, especially the internal diameter. They say that there's no alternative so any ideas where I might be able to get something similar in size to my original?


Thanks - It looks much better now its back in place.
Im waiting for the engine frame to be repaired before its powder coated. Been messed around by two companies now, telling me they are too busy after having it for weeks! :thumbsdow Its now with someone who is happy to do it, he's even looking forward to doing it but can't touch it until end of the month!
Im waiting for the engine frame to be repaired before its powder coated. Been messed around by two companies now, telling me they are too busy after having it for weeks! :thumbsdow Its now with someone who is happy to do it, he's even looking forward to doing it but can't touch it until end of the month!