What's new
Club Scuderia

This is a sample guest message. Register a free account today to become a member! Once signed in, you'll be able to participate on this site by adding your own topics and posts, as well as connect with other members through your own private inbox!

  • Please take a minute to read this thread about our recent server issues and forum platform Switch

Pre War Single Seater

It will be a while yet, the car will be on display at the Historic Motorsport Show at Stoneleigh, then we're moving to Devon so plenty to organise in the next few months. The plan is start up and test run by the end of the summer.
 
Nice one

Fantastic job looks the dogs goo---s , smashing .


Ps found some new shockers seem to pretty recent but will have them checked .


Thanks RAY:thumbsup: :thumbsup:
 
Looking great so far Bernard:thumbsup: How did you go about making the body panels for this? Did you do that in house also?
 
Looking great so far Bernard How did you go about making the body panels for this? Did you do that in house also?

No, completed all the chassis/mechanical/fabrication in house, but the actual body skin was fabricated by Miles at Vintagecars. We became friends via the Fiat Abarth world and when I contemplated building this car, Miles was involved from the first day. Without a contact to produce the bodywork it would not have been a practical project. There are a few details that make the body unusual for a car of this type, these include tapered louvers on the bonnet, (every louver is punched with a different sized tool), Recessed bonnet straps and a fully enclosed undertray. The body cost was considerable but worth it.
 
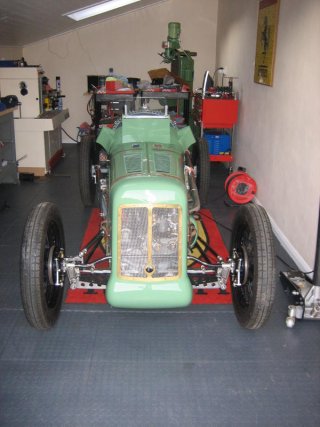
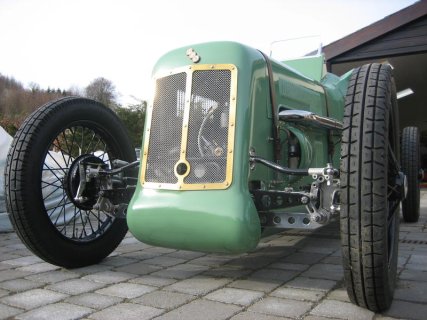
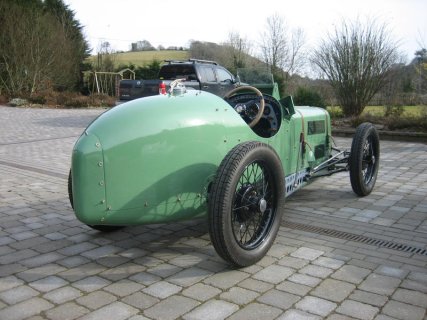
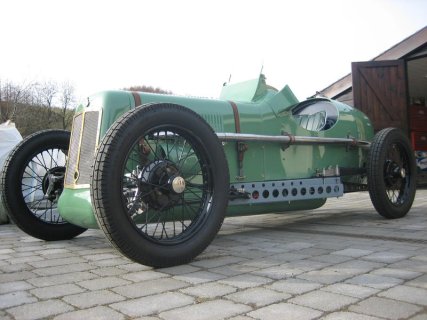
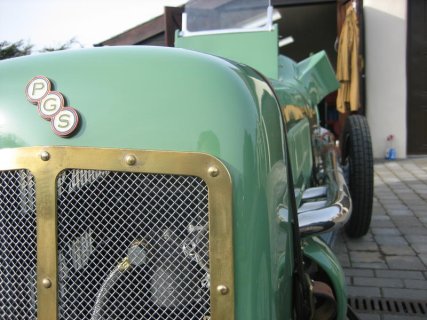
The car had its first roll out today, all the major work is complete but alot of details to finish, next job is the starter motor, then radiator, then start up! After that make a propshaft and a test drive.

Brakes, clutch,throttle, air pump, advance/retard, gearshift are all operational.

Looking good Bernard.....:thumbsup:
 
FANTASTIC............How long will the whole project take?

My car, a Surtees TS5 Formula 5000 took two years to restore, and the work was farmed out to a professional! You are a true craftsman..............well done!
 
Awesome! :thumbsup: Do you keep a diary of how many hours you put in on a project like this? Would really be interested in how many man hours a project like this consumes. :thumbsup:
 
Many thanks for all your kind words.

Its been in build for just under 2 years, I try to work on it almost every day, but some days that may be for 20 mins, other days 20 hours! I have many pictures but don't keep a record of the hours. Hope to have it finished and running in the summer. Al's going to paint it for me and should make more progress after the Stoneleigh Show.

I'm not planning to do any more cars in the near future, moving to Devon soon and I have always wanted to restore a wooden yacht, I'll have the space so maybe a Hillyard 7 or 9 ton will be next!
 
I'm not planning to do any more cars in the near future, moving to Devon soon and I have always wanted to restore a wooden yacht, I'll have the space so maybe a Hillyard 7 or 9 ton will be next!

Up to Wally standards I hope:tongue3: I'm sure it will be..
 
Hi Bernard,

fascintating project, an amazing amount of time and effort must have gone it to it, superb and a joy to see.

You have a close up of teh brake in one of your pics. Out of interest, is that a typical design of the era, to double up on the pads? Also, the mounting of the pads looks quite a high quality fixing, is that period also?

I can't see where the brake cylinder would fix. Just curios as how things work always catch my eye and this kind of project is particularly interesting. If you ever get board and want to fix a TVR, let me know!!


Cheers,


Richard.
 
Doubling the pads is not comman, but I used a 60's magnesium front brake shoe from an MV Agusta motorcycle that I was able to adapt due to being a similar size. All the other parts excepting the shoe I had to make from scratch. The shoes are expanded into the drum via two sets of cams acting on the leading edges of the shoes hence "twin leading shoe", the cams are rotated via cables (the cable guides are in another picture). Front and rears and adjustable for bias via the mounting at the pedal. Rear shoes are machined from solid with modern linings bonded to them (shown in another pic).

You can run hydraulics on pre war cars but cables work well if correctly set up and don't seize up on cars like this that are not often used!

Unfortunately having moved house in the last year, I've turned from car builder to house builder so progress is very slow! But the next project is the workshop and once completed I'll have the time to work on it again!
 
Well its starting to look like a car now, still lots of small jobs to do but hopefully running in the summer.
 

Attachments

  • IMG_1431.jpg
    IMG_1431.jpg
    68.2 KB · Views: 210
  • IMG_1435.jpg
    IMG_1435.jpg
    79.9 KB · Views: 188
  • IMG_1437.jpg
    IMG_1437.jpg
    84.2 KB · Views: 195
  • IMG_1438.jpg
    IMG_1438.jpg
    69 KB · Views: 239
  • IMG_1441.jpg
    IMG_1441.jpg
    86.8 KB · Views: 210
Top